Thursday, December 20, 2007

The 4 C's of Crystal Chandeliers


Collection:
Select the desired shape and style to fit your lifestyle and taste.

Cutting:
Select your quality cut of crystal (refer to above "Types of Crystal"). Buying a crystal chandelier is similar to buying a diamond. Choose your preferred shape and style of the chandelier. Next, the cost of the chandelier will depend on chosen quality of crystal.

Color:
Select desired finish. Glass arm chandeliers are available in Gold or Silver.Silver: The authentic color. Will reflect the true color spectrum of crystal. Works in all interiors.Gold: A dramatic color. Works well when complementing furniture and hardware in brass.

Circumference:
Understand the right size chandelier for your room. Proper scale 2" per foot of room. If circumference of room is 12' X 14', a 26" diameter chandelier is correct.

Additional Guidelines
4 - 6 person dining table: 20"-24" chandelier
6 - 8 person dining table: 25"-29" chandelier
8 - 10 person dining table: 30"-36" chandelier

Height above dining table: 30"- 32". Two story Foyer: 10'-11' above the floor.

Tuesday, December 18, 2007

A Guide to Crystal Chandeliers


Types of Crystal

Crystal may be machine cut, hand cut or molded. A description of crystal types follows:

Strass Crystal: Absolute perfection.
Considered the finest crystal in the world. Strass is manufactured by Swarovski AG in the Austrian Alps. Strass is an optically clear crystal, clear as spring water, totally free of flaws, unique in purity and brilliance. Strass crystal is characterized by razor-sharp cutting facets with the lead content in excess of 30 percent. Cutting and polishing are done by machine to achieve optical clarity. Strass crystals are treated with an invisible coating, which eliminates dust attraction and makes it easier to clean and maintain.

Swarovski Spectra Crystal: A beautiful value.
A passion for perfection has made Swarovski the world leader in the production of cut crystal. Swarovski & Co., manufacturer of Strass Crystal, has created a new alternative quality crystal. Swarovski has used advanced technology with old world knowledge to produce a brilliant crystal with precision cutting and superior light reflection. This crystal type is designed for a crystal connoisseur demanding quality at an affordable price.

Majestic Wood Polished: The choice of traditionalists.
Our majestic wood polished crystal is cut by hand in two stages on an iron and then a sandstone wheel. Each crystal is then polished on a wood wheel with marble dust. These methods go back centuries. If you look closely you will notice faint traces of the wood-wheel attesting to the concentrated labor of the artisan. This is a mark of authenticity. Each piece is a unique and original masterpiece.

Italian Crystal: Venetian heritage.
Venetian crystal (from glass-making regions in and around Venice) is molded, not cut. You will notice a rounding of edges that comes from fire polishing. Molded crystal though never as brilliant as cut crystal, has a subtle charm and is an exceptional value. It is an ideal budget crystal for heavily dressed and/or commercially oriented chandeliers.

Murano Crystal:
Imaginative form.
Each hand blown piece is a work of art. No two crystals are alike. When color is added, the crystal takes on a whimsical form. It comes in a variet of shapes and sizes. It comes in a variety of shapes and sizes. Including fruit, spheres, tear-drops and flowers.

Friday, December 7, 2007

How to Choose the Right Lamp

Adding a little light to your bedroom or living area seems like a simple task, and it is, provided that you consider some of the factors affecting which lamp fixture you should buy. Too many home owners and even decorators choose lamp lighting while out shopping without taking measurements and considering both the style and the purpose of the lamp to accommodate the necessities of the living area. Size, brightness, and style are very important when purchasing any type of home lighting, but lamp fixtures are especially particular because they serve the dual purpose of providing light and ornamenting the room. Before you go hunting for a new lamp, be prepared with a few helpful hints.

The size of the lamp is possibly the most important matter to determine. This is somewhat dependant on the functionality of the potential fixture. Will this lamp sit on the floor or on a table? Will it be used for reading light? Where will the lamp be positioned in the room? These are all questions that need to be asked. If the lamp is going to be placed on a table, it must have the right proportions so that the lampshade does not overlap the edges of the table. This not only prevents the lampshade from being bumped into but also allows for a few more objects to be placed on the table for display. At the same time, the lamp should not be too small for the top of the table. If the lamp is going to be utilized for reading or other activities that require adequate light, the size is especially crucial. The lamp and lampshade need to be large enough to illuminate the area for reading. It is helpful for the height of the bottom of the lampshade to rest at the same level as the ear of a person positioned on the bed, couch, or chair. Making measurements of all of these factors ahead of time will save you time later. Measure the table height and circumference and measure the height from the floor to the ear of a person sitting on the furniture. Additionally, take the weight of the lamp into consideration. If there are young children around the house, a heavier lamp base has a smaller chance of being pushed over. Lighter weight lamps should be used in areas that draw less traffic in the home.The wattage of a lamp fixture needs to be appropriate for the purpose of the lamp. Most lamp fixtures support a 60 watt light bulb. This is fine if the purpose of the lamp is mostly decorative or additional to existing lighting. However, if the lamp is used for reading or is one of few or only fixtures in a room a lamp that holds three bulbs or more will be much more efficient, if they produce 60 watts each. Most people should have 100 watts of light for reading, and there are some reading lamps that produce this wattage with a single bulb, but if you cannot find a fixture like this, a three-way fixture will work just as well.

The materials and styles of lamps are the most flexible options. The style of the room does not even have to completely match the lamp, which goes for the lamp material as well. As long as the finish of the fixture is complimentary or matching to the surface the lamp will rest on, the material can be chosen by taste. To narrow the search, decide on a contemporary or traditional style first and proceed by finding the right sized and proportioned lamps. Lamps need to pull a room together, whether that is by pulling two colors together or filling a space with good light, and without the right proportions it will be difficult. Picking the right lamp fixture may be the final factor in the success of your home lighting. Lamps are crucial decorative pieces that must provide the light you need while tying the room design together. Take the time to measure precisely and choose wisely.

When to Use Recessed Lighting

Recessed lights are usually used by architects and interior designers in rooms where the residents aim for a relaxed and soothing lighting effect. Recessed lighting is considered preferable to the use of multiple standing and side table lamps based on the mood they can induce in the occupant of the room. You will discover why interior designers are using recessed lighting when you enter a room that has recessed lights in them – to see is to believe, as they say.

The experts may recommend that you have recessed lights installed in your hallways and/or kitchen, to get the best use out of this form of lighting. Recessed lights are installed in the form of canister lights that will fit the holes in the ceiling they were fitted for. You will probably need an experienced electrician to guide the installation team in the installation of your recessed lighting, so that the finished work results with the recessed lights being set flush with the ceiling structure without compromising safety.

In the US, recessed lights may be known by other names, namely "can lights" or perhaps as "high hats", while in Canada recessed lights are dubbed "pot lights" instead.

Replacing old light fixtures with new can lights requires thorough computation of the total energy that will be used by the can lights everyday compared to the energy consumption of the old light fixtures. One problem with many structures is over-illumination that results in soaring electricity bills (with the problem made worse when can lights are installed in areas that not many people see anyway, and so cannot be appreciated.) Thus it is important the cost to install can lights and to maintain them, to be able to justify their usage.

If you are faced with a complicated can lighting installation procedure, you may need the assistance of a professional lighting engineer who will guide the installation team in how to install can lighting. The lighting engineer should not only know how to install can lighting, he should be able to assess where the can lighting is really needed, and how many can lights should be placed in different parts of the structure. If occupants later develop health problems like headaches, or high blood pressure perhaps, that may be caused by over-illumination of the interiors of the building, you should wonder whether the lighting engineer knew how to install can lighting properly in the first place, rather than ask why interior designers are using recessed lighting nowadays.

If you are in doubt as to the specifications to be used for your recessed lighting or can lights, you may consult The Illuminating Engineering Society of North America (also called IESNA) which sets the photometric standards for lighting equipment for manufacturers. This photometric data will show you how much light is distributed exactly by a certain form of lighting. This data should guide your lighting engineer as to the right type of recessed lighting and their specifications when mapping out the can lighting installation procedure for you and the contractor.

Friday, November 30, 2007

Lighting Can Transform Your Space: Lighting Tips for Making Your Home Look Brilliant

If you walk into any well-designed room, you'll notice that the room looks beautiful. You can see the impact of beautiful color on the walls, drapes with luxurious fabrics, and so on, but there's one elusive -- and often overlooked design element that can really pull a room together and make it look fantastic: Lighting. Lighting is the one part of decorating that's most neglected. Yet, a thoughtfully-designed room would rarely overlook lighting.

More than just useful, good lighting creates drama in a room. A mood can be set by turning down the lights to a golden glow, all by installing a five dollar dimmer switch. Different types of lights (general, task, and accent) can be added so that a room will glow with a variety of lighting that makes it appealing, makes it easy to find something, or that shows off the room to its best effect.

Layer lighting for the best results
Most rooms require different kinds of lighting, such as general lighting. This can be served by a standard overhead light such as a chandelier, ceiling fan light, or ceiling fixture. You may also want to consider adding perimeter lighting or accent lighting to bring a glow to the whole room instead of just the center. This kind of lighting will help bring light to the corners of the room, and can even make a small room seem larger. Lighting should be all around the room, at the center, and at places where you will be working or reading. Layered in this way, you won't be searching in the dark again.

Boost your design with light
Besides overhead lighting and lamps, what other kinds of lighting will make your room look terrific? Plenty. Lighting enhancements such as dimmer switches create soft glow and romance aplenty. Wall sconces are another source of light at the perimeter that can create both light and drama. Lighting artwork is yet another way to bring more attention and focus to different parts of the room. If you have original art pieces - and even if you don't - lighted artwork brings your eye to the outer walls of the room and makes your art seem more important. It's also a great way, again, to make a room seem larger, draw you into it, and make you want to stay there.

Move over 70's
In the 70's, a common lighting feature were light boxes installed around the room. These boxes were installed close to the ceiling of a room and had fluorescent lights installed behind, casting that unearthly office glow. Fortunately those days are behind us. Now we have rope lighting.
You can create a beautiful lighted ceiling accent by installing crown moulding around the perimeter of the room, and lowering it about four or five inches from the corner where the wall meets the ceiling. Then, place rope lighting inside the crown moulding. Of course, you'll need an electrician to place an outlet close to the ceiling, but it'll hidden by the crown moulding. When the rope lighting is turned on, your room will have an incredible warm glow.

More lighting ideas
When you want to create drama in a room, consider replacing white lampshades with black ones that are lined in gold. This will give the room great presence and drama, not to mention how they will transform your lamps. Don't forget uplights for the corners of a room -- another great drama-maker. At about $7 a light, they can be placed in plant baskets or behind a folding screen, providing tons of design for a small price.

If you have kitchen cabinets without lighting do consider adding it because it's great task - and accent -- light. Have interesting architectural features such as columns or stone walls in your home? Light them with uplights and they become more important and beautiful. If dark hallways are a problem, install wall sconces. They can completely transform hallways, making them look beautiful and interesting.

Make lighting convenient
Consider having an electrician wire an outlet so that when you walk into a room, you can flip a wall switch to turn on lamps in the room. The wall switch will make turning lamps on and off more convenient for you. This is a terrific tip if you are thinking of building a home.

Lastly, don't forget about all-important natural light. Make sure drapes can be pulled to the sides of windows so that the whole window is exposed. Curtains are often hung so that the rod ends just outside the window moulding. Then, when the curtains are pulled back it only leaves a small slit of window. Make rods larger and you'll let in more natural light.

Light the way in your home by adding or enhancing your current light plan. You'll see what a difference it can make in your rooms - and the way you feel in them.

By Kathryn Weber

Wednesday, November 28, 2007

Mood Lighting

Interior designers are unanimous on one thing: gone are the days when lights were meant only for illumination. These days, mood lighting is much more in vogue, and chandeliers, as well as light fixtures are well suited for this purpose. Mood lighting is a relatively new concept in interior decoration, and it means creating a particular ambience with light. This can be achieved by varying the color of the light, its intensity or the look of the lamp.

These days, more often than not, creating a mood, rather than illumination has become the primary purpose of chandelier lighting. The type of the chandelier and the nature of lighting used in it, play a deciding role in how the mood is created.


For those who prefer a traditional look in their homes, a five-arm ornamental chandelier in iron would secure the look. This type of chandelier has a stately look about it and can also be used at formal dinners. Crystal chandeliers possess a conventional and opulent look. They are elegant and exude an aura of aristocracy. If you want a soft romantic look, nothing can beat a candle chandelier, given that candles themselves look warm and inviting.


Robust-looking antler chandeliers are more in tune with the outdoor-type person, a gamesman perhaps. Then, you have the rustic-looking wrought iron chandelier, and, coupled with candle lighting, you have a period piece in your hands.

The possibilities are immense with the chandelier. With little variations in the type of lighting and in the make of the chandelier itself, drastic changes can be made to the look of the room and the mood you want to project.

Tuesday, November 27, 2007

Choosing a Crystal Chandelier for Your Bedroom

Crystal chandeliers can help make a room appear more elegant and more beautiful while still making it functional in terms of lighting.
When discussing about light fixtures, people usually think of crystal chandeliers initially, this may be attributed to its characteristic of being a well-known sophisticated and attractive lighting that can help improve the overall quality and aesthetic look of any room. This type of chandelier offers a wide variety of choices for its consumers, ranging from different and unique designs, different colors, to the size, shape and number of crystals that are actually used on the chandelier.
Although there are a lot of different kinds of chandeliers out there, crystal chandeliers are considered to be one of the most expensive and most popular types of chandeliers in the market. A lot of people are attracted to crystal chandeliers mainly because of its exquisiteness and majesty that can be associated with royalty or wealth, which is why a lot of people choose to use this type of chandelier in decorating their homes.
Where To Put Chandeliers
Chandeliers are more commonly used in the dining room or the living room, which are places wherein people mostly get together and hold parties or social gatherings. These are the more ideal places to put crystal chandeliers since these rooms usually have high ceilings, or offer enough space to accommodate whatever sized chandelier you may have, in order to avoid making the room feel cramp or crowded. However, with the evolving trend nowadays, chandeliers are beginning to find their way to other rooms that normally would not house such an ornate fixture. One room in particular is the bedroom.
Chandeliers In Bedrooms
Bedrooms are commonly used for sleeping and resting. This is considered to be a place of sanctuary for a person, especially for a person who wishes to get away from his work or the world in general. Since bedrooms are used for such intimate settings and purposes, putting crystal chandeliers in it would not be at the top of people’s list. However, crystal chandeliers in bedrooms can actually help create the mood that you desire for your bedroom, improving your bedroom’s aesthetic look as well as its functionality.
Choosing Chandeliers For Your Bedroom
When choosing crystal chandeliers for bedrooms, it is important to remember that the look of the chandelier should not overpower the aura that the bedroom is creating. Keep in mind that the chandelier should not be the main focus of the room, but the bed should be, which is why your chandelier should not be too over-elaborate in order to make it complement the room instead of overpowering it. The design should be soft and smooth to help accent the atmosphere of the bedroom.
The look of any chandelier is only half the battle, which is why determining the type of light, color and brightness, of the chandelier is just as important in maintaining the serene environment of your bedroom. You can always attach your crystal chandelier to a dimmer switch so you can adjust the light from very bright to a bit dim, depending on the type of lighting that you may need. In terms of color, crystal chandeliers can create some of the most stunning display of colors through the lighting and the crystals used on the chandelier, giving your room a certain aura and look. It would be best, however, if you chose colors that are not too dark or too strong, for this can help create a soft glow to your room, making it a more appealing place to rest.

Wednesday, November 7, 2007

Illuminating Your Outdoor Gardens

Garden lighting makes gardens attractive and accessible long after dusk and allows gardens to be enjoyed after a hard days work when the sun has set. Lighting adds atmosphere to an evening garden, allowing access at anytime. At night your landscape can wear a different face and have a totally different look from its daytime appearance.

Give your garden an elegant look by adding lighting to it. To enjoy your garden at night, the lighting must be just right. Beautiful wall lanterns will add a sparkle in daylight and a magical glow in the evening. Landscapes emerge at dark under subtle lighting to create wonderful shapes in hauntingly beautiful sculptured drama. Whether glowing with an inner light or outlined in an elegant tracery against the night sky, landscape lighting paints the beauty of natural and cultivated forms, a pool, fountains and pathways with subtle shade, shadow and color.

The benefits of outdoor garden lighting are numerous: Safety - illuminating pathways, indicating hazards, such as steps, or marking safest routes. Path lighting provides a safe walkway and adds to your home’s security. Atmosphere - The loss of daily enjoyment is solvable through garden lighting, by transforming darkened patios, decks and flower beds into a welcome fantasy of light.

Different Techniques of Garden Lighting:

Up lighting is the most commonly used technique to illuminate trees, walls and sculptures and down lighting is a mimic of natural light - the fixture is located overhead with the light shining down from above.

Moonlighting can be achieved by placing the fixture high above the ground and to produce a broad, moonlight effect.

Shadowing techniques require the strong shape of plants such as yuccas, and surfaces such as a wall or lawn to create the most powerful effect.

Spotlighting is used sparingly to pick out larger plants, trees, statues and architectural features.

Floodlights are a broad light beam that covers large areas and can create dramatic silhouettes.

Accent Lights are small fixtures placed close to the ground which provide a subtle source of decorative lighting almost anywhere in the garden.

Spread lighting uses wide beam angles to light larger features such as lawn areas, flowerbeds and borders and low shrubs makes strolling around a garden in the late evening very pleasurable.

Cross technique is used to pick out and highlight the statue, urn, gnarled tree trunk, bonsai, archway, etc.

Silhouetting technique is often used to highlight the outline trees, palms or archways.

To create a balanced and interesting atmosphere in the night time garden, use a variety of fixtures and lighting angles, placing fixtures in the foreground, middle distance and background.

Up lighting, down lighting and side lighting are the three basic forms of garden lighting. Use a combination of all the three for the most pleasing result. Lighting systems come in low-voltage and standard-voltage configurations. Use standard voltage for large areas and for security, low voltage to accent individual plants.

Tuesday, November 6, 2007

Kitchen Lighting

Kitchen Lighting is something that homeowners tend to forget to take serious.

Natural light can do wonders for a kitchen by making it a happy place to work. When you are planning your kitchen design, think of a place you would like sunlight to enter. For morning sunlight install windows that face east. This is great for morning hours.

Install a large bay window near the breakfast area. If the sun gets to hot, you can install an outdoor awning that can block summer light, or blinds can work.
Talk to your architect or builder about placement of the windows. Make sure that your architect has placed large windows to let light in the kitchen. Some kitchens have no windows. In this case when you are designing your home, make sure your kitchen is placed in an area where you are facing outdoors, not in the middle of the house.

There are so many health benefits to having the proper lighting in your kitchen.
You can work better when preparing meals. When hosting a party, your guests can see who they are talking to and what they are eating.

Natural kitchen lighting also has health benefits, such as it has vitamin D. It can help fight the winter blues. During the winter month’s people tend to be more depressed.
Have a cozy breakfast area with plenty of sunlight, where you can read the paper and relax in the morning.

Task lighting is very popular in the kitchen, such as a series of fixtures above a kitchen island or fluorescent tubes under a row of above kitchen cabinets.

Ambient lighting is scattered all over the ceiling of the kitchen to give an overall everyday light. Track lighting or recess lighting is used for this type of light. You can control the brightness by using a dimmer.

Decorative Lighting draws attention to a specific area such as a pretty back splash. Chandeliers are a form of decorative lighting. Christmas lights can be used though out the year as long as you use it with no color lights. Placing them on artificial plants above the kitchen cabinets can give a great look.

If you are building new home, a good architect will go over the positioning of where all the electrical wiring should be placed. Take it from me; I had to learn the hard way.
I was not told where the lighting would be placed. My first kitchen had only one strip of track lighting. I was not a happy camper. We were always squinting and my kids had a hard time trying to see what I made for dinner.

Thursday, October 25, 2007

Lighting For Your Kitchen And Cabinets

Kitchen Lighting
Kitchen lighting is a form of home lighting specifically for the functional purpose of a kitchen. In the kitchen several requirements need to be met and these must be aided by precise lighting. Thus kitchen lighting is mostly task lighting and ambient lighting and less of decorative lighting. Good kitchen lighting, from an aesthetic and functional standpoint, incorporates both ambient and task lighting.

From the perspective of a professional lighting designer, the kitchen is one of the more interesting and versatile projects one can tackle. Filled with numerous nooks and crannies, cabinets and appliances, shelves and other specialized areas such as islands, kitchens can present more lighting challenges than any other room in your home.

Start with the task areas. These are best lit with bright, shadowless light. Fluorescent tubes are particularly well suited for this. You want to get the fixture close to the task area so as to get maximum light concentrated on the area you wish to work. In kitchens this would be counters, sinks, and tables. Spot lights and directional lights also provide task lighting in kitchens. For pantries or other closets, small Under Cabinet Lights provide good illumination. They can be mounted inside the closet above the door header to provide glare free lighting on the closet contents.

Ambient Lighting
Ambient light is the general, overall light that fills in shadows, reduces contrast, and lights vertical surfaces to give the space a brighter feel. Fluorescent tubes are well suited to the job of providing ambient light. They provide broad, even illumination and their efficiency makes it possible to fill the space with light without turning it into an oven. Incandescent down lights are more dramatic and give a brilliant white light but require several fixtures to avoid shadows in a kitchen.

Direct Lighting

Direct lighting is achieved by using conventional recessed lights, surface lights or light fixtures that are on a pendant or chain. These types of lights work well to provide bright lighting for work surfaces and general purpose lighting in the kitchen area. Rope lighting and small recessed lights are budget friendly.

Accent Lighting

Add a layer of accent lighting. You may be lighting artwork, architectural details, collectibles, or a food presentation area.

Kitchen occupancy sensors can be used in place of expensive complicated 3-way switches in kitchens with multiple entrances. If the sensors can "see" all the entrances from their mounting location, they will turn on the lights automatically whenever anyone enters the room from any direction.

The importance of kitchen lighting is often overlooked. The traditional kitchen has been replaced by a modern one where people interact in quietude over the counter. Thus kitchen lighting is evolving with the needs of modern households.

Cabinet lighting

When it comes to interior, cabinet décor is a matter of high attention as beautiful cabinets make the place more attractive specially kitchen. Normal type of lighting has a problem of shadows and reflections and it hampers the quality of light. There are under cabinet and cabinet lightings having different types of uses and specialties. Cabinet lighting has a variety of old and new-fashioned lights with a great variety. Polished with brass and silver the lights look more attractive and they make the cabinets look brighter. These days there are a lot of lights having a great finishing touch with a variety of colors. There is a great lighting including ambience lights and halogen lights that are used for enhancing the quality of cabinet brightness.

Types of Cabinet Lighting

The types of lights depend upon brightness, consumption of voltage, color and temperature. There are some adjustable lights that can be moved in a full circular motion. Some people have a problem of heat from the lighting so for them lights with an effect of florescence can be of a great use. Like the halogens radiate heat and create a problem for the people who cannot sustain heat these are a convenient option. There are some lights that have a brightness adjustment effect and they are very useful in each time of the day. Another good point is efficiency of energy and flickering free technology that can cut down maintenance cost. The life of lamps is more due to usage of xenon and hence they are worth of their price.

Usage of Cabinet Lighting

Most of the cabinet lighting is used fro display of things or to provide a sufficient amount of light for normal working. Most of them are used in the office for desktops, at hospitals, studying rooms or library, bathroom closets, bedroom shelves, nooks and corners along hallways and stairways, living rooms, family rooms and anywhere else where a little brightness is required. For the kitchen installation one thing should be kept in mind that it should be in front or near the cabinet. It will be beneficial for providing the exact amount of required light with an added elegance of brightness to the kitchen cabinet. Hence by the usage of these tips you can enhance your cabinets.

By Jamie Ho Snodgrass
Jamie is author of other Lighting Tips located at Home Improvement Tips and Lighting Information

Improve Your Kitchen With Better Lighting

When we think about home improvement projects we often think changing or adding to a room but one of the most important improvements you can make in the kitchen is to make sure you have the proper lighting. You need to make sure that the room is not only illuminated, but that you have enough light to work, no matter which area of the kitchen you are in. Here are some tips on how to plan for perfect kitchen lighting.


Overhead Lighting


Many kitchens, and especially older ones, only have one type of lighting or even worse, perhaps only one light! You may be thinking that a big light centered in the middle of the ceiling will serve your need effectively, but it is rarely enough. If you do go with one overhead light, make sure that you plan to incorporate enough reflection to let the light bounce into every part of the room so that it is lit properly..
One thing to consider if you only have room or resources for lighting on the ceiling is track lighting. This type of lighting will allow you to direct the light to specific areas of the kitchen. You can install a light or point a light to each work area as well as your stove and kitchen table. Or, try using track kitchen lighting for the work area and then install additional lighting over the table or island areas.


Counters And Work Areas


Typically, one big light in the middle of the room will be inadequate for proper task lighting. Save up to 40% on kitchen products at The Inside Store Choose from a wide selection of fine kitchen faucets including the Vintage II Collection Wall Mount Faucet with Gooseneck Swivel Spout. It is problematic since when you are standing at the counter with your back to the light you will be casting a shadow right on the area you want to illuminate. Task lighting is important for proper food prep and will make your kitchen chores much easier.
For great task lighting consider kitchen lights that are installed on the bottoms of the cabinets that overhang your kitchen countertops. You’ll be able to easily see while you are chopping vegetables and preparing meals. This lighting is soft enough to provide the right amount light and can be easily turned off as needed or leave just one light on at night as a “night light” of sorts.


Island And Table Lighting


You’ll also want to consider how you light the island and table areas. Here is where you will want to insure that lighting is adequate, and looks great with the style of your kitchen.
For eat in islands, the most popular type of ighting is lights that hang down from the ceiling. The length of your islands dictates how many lights you will need. The table lighting should be chic and is most practical if you can get lighting on a dimmer. Typically, you would want some sort of chandelier for right above the table but be sure to match the style to your kitchen decor.


Lee Dobbins writes for http://www.dailynewz.info

Friday, October 19, 2007

Recessed Lighting Basics

Hidden in Plain View


recessed lightingWhether you’re building a new home or renovating an old home, lighting is a key element in both the function and style of the space.

Here are some basic tips in what to look for when considering installing recessed lighting.


Why You May Want Recessed Lighting

Recessed lighting offers a clean, streamlined look in a home. It can increase the amount of light in a room, highlight artwork or other special features, and open up spaces so they look and feel bigger.


When to Use Recessed Lighting

Though recessed fixtures are most easily installed between ceiling joists of new building or major remodeling projects, some recessed fixtures are designed specifically for retrofit applications and can slip into an existing ceiling space through holes made to accommodate wiring; however, the fixtures you choose must be rated for use near insulation (IC housing rated) whenever ceiling insulation is present.
When a ceiling is uninsulated, a non-IC housing may be used.


Where to Place Recessed Fixtures

Avoid recessed fixtures placed too close together or in rows down the center of the room. This type of installation can have the look of an airport runway.


Match the size of your fixtures to how close together they can be installed. The common rule is that 4-inch fixtures should generally be placed at least 4 feet apart and 6-inch fixtures about 6 feet apart.


Center recessed fixtures in front of the objects you wish to light – a painting, bookshelf, or drapery panels, for example – and about 12 to 18 inches in front of that object.


Recessed lights used for reading or task lighting should be carefully placed overhead so your head and shoulders will not block needed light.


When lighting a three-dimensional object such as a fireplace, sculpture, or flower arrangement, it is more effective to light it from two or three different angles.


Use wall-washing fixtures around the perimeter of a small room to help “push” the walls out and make the space feel larger, or aim them at a collection of artwork or photographs to call attention to the display.


Sizing Recessed Light Fixtures

Whether you choose fixtures with standard line voltage, low voltage halogen, or fluorescent fixtures, the basic sizes are 4-, 5-, or 6-inches in diameter. The 6-inch fixtures can be used in tall entryways or two-story hallways, while the smaller 4-inch sizes work better in smaller spaces since they have a sleeker, contemporary look with minimal intrusion.


Extras

Adjustable eyeball fixtures can be aimed at artwork as accent lighting.


Cover the walls with light by selecting wall washer fixtures.


Choose reflectors when you want the most light from a fixture, or install white or black baffle trims to focus and direct light or reduce glare.


Types of Light Bulbs for Recessed Lighting

When selecting or installing recessed lighting, several types of fixtures and bulbs are available for specific needs.


  • Incandescent, also known as “A” bulbs, are inexpensive and good for general light or wall washing with the use of reflectors.

  • “R” bulbs are most common and have a reflective surface included on the back of the bulb.

  • Halogen bulbs offer a clean white light, and are available in both flood and spot types in sizes to fit 4-, 5-, or 6-inch fixtures.

  • Low voltage halogen bulbs have a long life and put out more light than incandescent bulbs, but require the use of transformers and special low voltage housings.


When to Skip It

Ceilings of concrete or with ornate plasterwork or delicate molding details are not good candidates for recessed lighting. In these spaces, choose a chandelier (if there is an electrical box in the ceiling), wall sconces, or table lamps instead.


Cautions

Know your home and its construction before purchasing any lighting components, since each installation will be unique. Get advice from an experienced electrical salesperson on what parts are needed for your space – including special wiring, transformers, bulbs, or IC-rated housings. In some local areas you’re required to obtain building permits to upgrade or install recessed lighting. If the project is too advanced for your skills, have your new lights installed by a qualified electrician.


By Carol Naifie "Your Guide to Interior Decorating"

Monday, October 15, 2007

3 Reasons to Get Remote Lighting Control

Scenario 1
When you go to bed at night, you'd like the ability to control all the lights in the house from your nightstand. That way, if you forget to turn out a light downstairs, or if you hear a noise in the yard in the wee hours, you don't have to leave the bedroom.

HOW TO GET IT: Select the lights you want to control—hallway, kitchen, backyard—then swap out those switches for automated dimmers. Assign the switches to buttons on the controller, either one light per button or groupings of lights you want to operate together, say stairway and kitchen for late-night snack runs. Some controllers also have "all on" and "all off" buttons, which will operate every switch assigned to it at once.

Scenario 2
You're away from home frequently, or you own a vacation house, and you want to time lights to discourage would-be burglars.

HOW TO GET IT: Swap out the switches for automated hardware and program the timing of each at the control pad or wireless remote. Set the lights at haphazard intervals, so that an observer would really think someone is wandering from room to room. The advantage to digital timing is that, unlike with those pesky plug-in timers, you can switch the lights on and off whenever you want while you're home and the timer will be unaffected.

Scenario 3
You don't want to run around adjusting lights when company's at the door.

HOW TO GET IT: The ultimate in lighting control is using the system to set a whole-room scene: Dim a light here, bring up another there, until the mood is just the way you want it. Then assign your newly designed "scene" to a control panel or keypad button. You can even create several scenes in a room for different purposes—one button for cocktail-party mode, another for television watching, and a third when it's time to clean up.

This Old House magazine, January 2006
Article: Product Innovation: Remote-Controlled Lighting

Friday, October 12, 2007

Bird on a Fixture

Why It Is Good to Buy Good Quality Light Fixtures

Selecting chandelier lighting for your home

With such a variety of Chandeliers available today there is always that perfect one for any home. With a range of styles, designs and finishes to choose from selecting a chandelier can be as much of a creative process as you would like it to be. Each chandelier adds a touch of class to any room and warmth or vibrancy into any atmosphere. Styles can range from elaborate and large to modern and aesthetically pleasing. Chandeliers complement other lighting well and will add value to your home.
When choosing a chandelier for a dining room, the Victorian style is highly recommended as this popular design will add tranquillity and calm to a room that can be chaotic at even the best of times. There are always popular choices to choose from with Wrought Iron and Crystal styles at the top of the list. Some chandeliers can be hung alone as a center piece feature that will dress up any room. Choose from the vast array of finishes and shade styles to find a design that will create a room of modern style with a touch of love for art. Chandeliers can range decorative styles to create a modern, dramatic, simple, elegant and formal look.
The styles of chandeliers available include Tiffany, Victorian, Art deco, South western, Tropical, Crystal, Transitional, Early American, Lodge style, Whimsical, Old world, Oriental, Traditional classics, Country cottage, Architectural and mission style. Each chandelier style can work best in it’s own setting whether for a modern look, shimmering elegance, relaxed or sleek and shiny. Find the perfect finish for your room and it will work wonders with existing furniture and style. The finishes range from white or beige, multi-coloured, polished gold or brass, crystal, polished nickel or chrome, wood, rattan, iron, brick, bronze, rust and antique or satin brass. The type of chandeliers can include centre bowl, no shade, pot racks, crystal and shaded candles.

Chandelier Installation
Before you begin the installation check the ceiling electrical box to ensure a new light will be securely supported. If the new light is around the same weight as the old light, then the electric box should be able to support the new light fixture. When hanging over a dining table, centre the light in the middle of the table with 30" distance between the tabletop and the light, to prevent any bumped heads. When buying bulbs, you should decrease the bulb wattage when larger numbers of bulbs are required. For example, a 2 socket light could be fitted with two 60 watt bulbs, whereas a chandelier with three or more light sockets is probably more suited to 40 watt bulbs. Once correct bulbs are installed, the chandelier should give off sufficient light coverage without blinding anyone. Dimmers are helpful as they allow you to adjust the light to your requirements.


Cleaning Chandeliers
It is always a good idea to clean your chandelier at least once a year to keep it looking clean and shiny. Before you start, turn the lights of at least 10 minutes before you begin so the bulbs can cool down. Never clean the chandelier while the lights are on, this could lead to a burnt hand. If you are going to remove the pieces then separate the light in sections or draw up a picture of how the light fits together so you won’t be frustrated and confused later when trying to put the pieces back together. Place a blanket or duvet under the light to catch any pieces of the light that may fall. Keep the fixture in the same place as you clean and do not turn it around as this may strain the power cable.
When you are ready to begin, remove the trimming such as pendants and place in container. Clean with mild detergent and then rinse in hot water. The hotter the water the less spots. When cleaning festoons, place under water at arm length to stop from intertwining. Always use mild detergents as harsh cleaning products can make the pendants brittle and blackened. Many darken with age but it is always good to delay this as long as possible. When cleaning the body of the light, it is recommended to use a dry, lint free cloth for the best possible result. Remember to dust the bulbs as well as these are give away to cleanliness of the light. Replace all light pieces on the chandelier and lightly polish it to remove any remaining spots.

Friday, September 28, 2007

Illuminating with Mini-Pendants


One of the best instant upgrades to the hub of your home, the kitchen, is to replace your antiquated island, breakfast nook or counter lights with sparkling new mini-pendants.


Pendant lights gently hang from the ceiling getting their name from the jewelry accessory of the same name. Mini-pendant lighting has a distinctive appeal and is considered perfect for places like kitchen islands, desks, breakfast nooks and the like.

I advise mounting mini-pendant lighting fixtures at 18" to 24" above the surface area to be lighted. Today’s mini-pendants are hung with coax cable, solid rods (6 and 12 inch) or decorative metal designs with stylish chains. This allows you to achieve the perfect height for your application no matter how high or low your ceiling may be.

The light source of preference is halogen. Many of our customers enjoy the option of using a color corrected MR16 for focused lighting or a simple halogen bi-pin lamp that brilliantly illuminates the shade. Most of our mini-pendants allow the user to swap out these two halogen lamp sources for effective lighting.

Whether your tastes are fine European hand blown glass, dazzling arts and crafts, ultra modern lines or timeless Americana, mini pendants will brighten your kitchen and bring to your home the WOW factor.

Wednesday, September 12, 2007

Tiffany Pendant Lighting


Tiffany pendant lighting styles are as varied as they are beautiful. The storied and infamous tradition of art glass lighting has been carried on to perfection by such manufacturers as Quoizel Lighting, who employ the same techniques and high quality materials used over a century ago when Louis Tiffany was still creating his masterpieces.

Tiffany pendant lighting can be found in two basic varieties: upward or down light. Upward Tiffany pendants are designed so that the light is bounced off of the ceiling and then reflected back downwards into the room. In other words, the upward Tiffany pendants are inverted so that their bulbs and shades both face the ceiling. This produces a very calm and flattering illumination.


For Tiffany pendant lighting fixtures designed in the down light style, the bulbs and the lampshades are facing downward and directly illuminate objects below. This may be a better choice if you read, sew or do basic tasks directly under the pendant(s).

Wednesday, September 5, 2007

Track Lighting and Compact Fluorescents

I’m often asked if our tradition two and three wire track heads are compatible with compact fluorescents. The answer is yes, as long as the CFL isn't hanging out of the can and drawing the eye to the glare.

Incandescent track heads will handle compact fluorescents but the challenge is getting something that fits, AND throws the light out of the can. Even though the CFL manufacturers name the CFL’s reflector floods BR30, BR40, PAR38 we all know that the CFL versions are larger than the incandescent/halogen versions due to the necessary ballast.

Spiral CFL’s fit nicely into traditional type track heads but will trap the light inside of the can reducing the illumination and performance of the CFL. When using CFL’s in track lighting try to fit a CFL that has a reflector, pushing the useable light out of the can.

I’m often asked what the difference is between two wire and three wire track and track heads.
Simple; most two wire track and track heads are Juno compatible, the second largest track lighting manufacture in the world, and most three wire track and track heads are Halo compatible, the largest track and track lighting manufacture in the world.

If you are ditching your existing track heads and intend on buying new track heads to install in you existing track system make sure you gather all possible information on your system before making the purchase.

Thursday, August 30, 2007

The Basics of Disk Lighting

Thinking of adding a new layer of lighting to your kitchen
and don't know where to start? Here are a few FAQ's that I address on a daily basis with homeowners across the country:

First off, how many disks will I need for my under cabinet lighting?

The average distance from the bottom of kitchen cabinets to the kitchen counter top is 18”.
At this distance I would recommend a task type throw which at this mounting height will produce a 12” cone of light on your kitchen counter. I recommend spacing the disks 12-16 inches apart.

How many transformers will I need?

In general, you will need one transformer per wall switch/dimmer.
Let’s say you’ve penciled in 10 disk lights. If you have a large kitchen and want to independently switch five disks on one switch and the other five on another switch then you will need two transformers.

Tip: most people I help with disk lighting systems prefer to switch the entire system with one wall switch or better yet a dimmer which means you can usually get by with only one transformer.

What are my options on transformers?

We offer both electronic and magnetic transformers and both work well depending on your total load and placement of transformer.

Electronic transformers will handle a range load of 15-60 watts but must be placed within ten feet from the last disk in the run. I recommend placing the transformer in the middle of the run to assure compliance with the 10 foot rule. We do offer a dual output 60 watt electronic transformer that will allow 60 watts per output max. The dual 60 watt electronic transformers are perfect for smaller jobs, but remember, the ten foot rule is still in effect.
For a smaller system I recommend using a 15-60 watt electronic transformer or the dual 60W output.

Magnetic transformers will handle loads ranging from 75-500 watts. Magnetic transformers are more tolerant of distances allowing them to be placed in attics, utility closets or any reasonable out of site location. Toss the ten foot rule out the window!
Magnetic transformers are great for any sized disk lighting job and are what I recommend for maintenance friendly operations.

Which light bulbs do you recommend?

I always recommend an 18 watt xenon light bulb as they produce a crisp clean halogen like appearance while lasting 2-3 times that of halogen. Xenon also burns a bit cooler than halogen.
Incandescent light bulbs are also offered in lower wattages. These typically cast a yellow white light that is associated with incandescent and have a much shorter life than the xenon version.

Wednesday, August 29, 2007

Porcelina Lighting Fixtures

Porcelina™ Collection was crafted to offer large-scale lighting fixtures that coordinate with our extensive Limoges Collection™ of translucent porcelain. The sculptured surfaces of these faux porcelain fixtures capture the classic, yet contemporary, designs of the delicate Impressions patterns of the limoges Collection™.

Available as large pendant lights and semi-flush lighting fixtures.

Thursday, August 23, 2007

Outdoor Lighting Around Your Home

Outdoor lighting has become hugely popular in recent years and for good reason: We’re gardening more than ever but we also travel and enjoy activities that bring us home after dark. Why not be able to enjoy a beautiful landscape even after the sun goes down?

Outdoor lighting has functions other than beauty. Security lighting deters prowlers, and safety lighting prevents tripping and other hazards after dark. Fortunately, the three functions often work in harmony. A pair of sconces that illuminate each side of a set of exterior French doors can also provide security, lend lighting to a step, and supply ambient lighting for a seating area nearby.

Low voltage lighting that runs along a home’s front or back pathways can make clear the change in grade but also illuminate the roses planted in a bed that runs along the walk.

No matter what sort of outdoor lighting you select, design it to work in harmony with the architecture of your home and your landscaping.
Exterior lighting can show off a home and make clear the pride you take in the landscape around it.

Wednesday, August 22, 2007

Bathroom Lighting

Whether your bath is a large, sprawling retreat or a tiny, more utilitarian space, the lighting needs for bathrooms are fairly universal.

The first consideration is the intensity of light. It’s tempting to blast a bathroom with high wattage. It’s where you shave, where you hunt through drawers and where you attempt to read tiny print on pill bottles.

But it’s also the place where you have to walk in and look directly at your face first thing in the morning. It’s a place for putting on makeup and styling hair. It’s also a place to unwind with a long hot bath and a great book. So good lighting in the bathroom has to be serviceable but flattering, bright but adjustable.

It’s a big order but surprisingly easy to achieve with some simple lighting tricks. Start with a bright light in the middle of the room so that when you hit the switch in the day and at night, the entire room lights up as needed.

You’ll also want a light over the shower or tub where seeing your footing is essential, especially with older users. The more fixtures you have, the greater the need to test the overall wattage in order to not under whelm a space.

At the vanity, install lighting that bathes faces with warm, flattering light from both sides – not just from above, which is an unflattering angle. Consider different switches – a dimmer over the general light, another for wall sconces – to provide grater control in your lighting scheme. If there’s a tub, you will also want the option to lower the lights with a dimmer switch to create soft, relaxing glow to unwind with a soak after a long, hard day.

The first step in layering bathroom lighting is overall light: ceiling fixtures or recessed lighting works brilliantly.
Task lighting is the second layer of lighting. Consider sconces, shaded vanity lights, and strip lights.
Finally, the third layer is accent lighting. Portable lamps, toe space lighting and strip lighting.

Thursday, August 16, 2007

Lighting for Utility Areas

Banish the blues from your home’s mudroom or laundry room with lighting that makes dull household tasks a little more pleasant.

Provide task lighting at all work areas in your home, such as a long countertop, laundry room, drafting table, or any other place you’re likely to be doing reading and close work. Hard working task light under cabinets can provide all the down and dirty illumination you need in a laundry room.

Utility spaces don’t have to be lit with ordinary, run-of-the-mill fixtures. Choose an ambient fixture that blends with the rest of your spaces décor in style and design. If you have a bookcase, provide a spotlight or another lighting fixture nearby so you can easily browse.

A return to traditional roots seems to be quite popular in today’s utility areas.
Don’t rule out energy efficient lighting as these fixtures provide excellent illumination and introduce less heat which makes chores more enjoyable.

Wednesday, August 15, 2007

More Frequently Asked Lighting Questions

What is the best general illumination for a Kitchen?
Unfortunately, there aren’t any easy answers here, since so much is determined by the size of your kitchen area. Most people start with a 2 light or 4 light decorative fluorescent in the center of the ceiling. It’s less costly, uses less energy and provides very good general illumination.

What do I do about task areas such as islands, areas over the sink and counter tops?
Besides the general lighting guidelines in the above answer, these areas call for more concentrated lighting since they are normally work areas. Under cabinet lighting and or linear lighting will provide brilliant light on work surfaces, soffits above cabinets and other concealed locations.
A decorative pendant with 2 or 3 shades can be installed over your island for sufficient light and add a decorative element to that area.

How do I light a dinette area?
Normally, a decorative pendant(s) or a mini chandelier with a down light will do the job while providing plenty of light on the tables surface. Use a dimmer to soften the light for mood dining when entertaining or to increase illumination when doing homework, hobbies, when needed. Again, the bottom of the pendant or mini chandelier should be about 30” above the table.

What’s the best way to illuminate a bath or powder room?
Most of us want to see a flattering reflection in our bathroom or powder room mirrors so we can apply makeup, shave or brush our teeth correctly.
To avoid shadows, and to fully surround your face with flattering light, install a vanity fixture 24” wide over the mirror, plus two sconces (one on each side of the mirror) at least 28” apart and 60” above the floor.
If you have a double sink vanity, use a light that is almost as wide as the mirror. The light should be mounted 78” from the floor, centered over the mirror.

How high should I mount the wall lanterns around my front door?
No fast and hard rules on this. It depends on the height of your house’s front entrance. Typically are nice height is approximately 66” above the bottom of the door, slightly above eye level.

Tuesday, August 14, 2007

Frequently Asked Lighting Questions

How do I determine the right size for my chandelier?
A chandelier should be approx. half the width of your dining table and approx. 30" above the tabletop. Ceilings higher than 8', raise the height of the fixture about 3" for every additional foot in height.

What size chandelier should I get for my foyer?
For an approx. diameter, add the length and width of the room. Example: for a 10' x 12' room, you would add 10 + 12 = 22 for a diameter of 22".

Will a chandelier alone be enough light?
If you’re not comfortable with the amount of light based on the formula above, you can add sconces, portable lamps or recessed lights to add more light and ambience.

What spacing should I use for wall sconces?
Install sconces approx. 60" from the floor and 8' to 10' apart.

How do I determine the amount of light I need for a certain size room?
Multiply the square footage of the room by 1.5 to determine the approx. wattage necessary. Example: for a 10' x 12' room, you would multiply 10' x 12' = 120 sq. ft. x 1.5 = 180 watts approx.

How much light do I need for my kitchen island work area?
Multiply the square footage of the island by 2.5 to determine the approx. wattage necessary. Example: for a 4' x 6' island, you would multiply 4' x 6' = 24 sq. ft. x 2.5 = 60 watts approx.

How do I make a room look bigger than it really is?
Using mirrors to bounce light from fixtures and windows will give the room an appearance of being bigger than it really is.

Friday, August 10, 2007

Pendant Lighting

Pendant lighting fixtures are suspended from the ceiling and get their name from the jewelry accessory of the same name. Pendant lighting has a distinctive appeal and is considered perfect for places like kitchen islands, desks, breakfast nooks and the like. Pendant lighting can be either a single pendant lighting fixture or two or three different ones teamed up to provide a dramatic effect. Generally when two or three pendant lighting fixtures are teamed up, mini pendant lighting fixtures are used. The area of pendant lighting provides a lot of scope for the use of creative designs and ideas.

It is advisable to mount pendant lighting fixtures at least 24" to 30" above the area to be lit. When mini pendants are used, the ideal height would be 18" to 24" above the surface area to be lighted. When two or three pendants are used, an adjustable pendant bar can be used to fix them at different heights. This makes it possible to adjust heights from time to time, varying the overall lighting effect in the process.

Pendant lighting fixtures are available in various styles. Some of the commonly seen styles are sleek clean designs, reflective stained glass and crinkle glass designs. Pendant lighting fixtures are task oriented and provide necessary lighting for specific areas. The intensity of light needed can be dictated by the choice of bulb used inside the pendant lighting fixture.
Most pendant lighting fixtures are available with chains and rods that enable adaptation for different heights. Multiple pendant lights in a single fixture at staggered heights create a dramatic effect and are ideal for use little corners of large rooms. This kind of lighting creates an interesting area in an otherwise ordinary room.

Thursday, August 9, 2007

The Basics of Dining Room Lighting

A dining area has to provide a soothing spot for large gatherings and more intimate dinners. Set up yours for flexibility and enjoyment.

Whether your dining area is merely small space attached to an open kitchen or a gracious formal area reserved for company only, its lighting needs change drastically.

A dining space has to be able to host a nice evening dinner for grown ups, or a smaller intimate get-together, be a good place to relax with the paper in the morning.

The heart of dining lighting is the light directly over the table. In a formal, traditional setting, a chandelier might preside. Chandeliers can be classic or contemporary and are great options, but there are a host of interesting options on the market sure to match any décor and mood.

Around the perimeter, there are other opportunities to design and set the moos with light. If there is a buffet or side table, lighting specific to that spot can make it seem special and show off deserts or drinks while providing task lighting to make serving from the area a lot easier. China cabinets or shelves can also be highlighted with special disk/puck lighting to show off collections and add warmth and character to an often minimally furnished space.

In existing dining rooms, if you have lighting only from above, balance it by adding light from the side and below, such as a table lamp. You’ll not only have a well functioning space, but you’ll also design a warm, welcoming dining space that creates memories for years to come.

Again, addressing the layering of lighting, start with:

A) Overall ambient light such as a chandelier, pendants, recessed cans or track lighting.
B) Task lighting with recessed cans or portables.
C) Accent lighting for china cabinets or uplights behind potted plants.

Wednesday, August 8, 2007

Lighting with Layers

A well lighted room has a more complex lighting structure than just a single overhead fixture or table lamp. Rooms should be designed with layers of light, creating a warm and welcoming space.

Start by picking what’s important in a space, work from that one layer, and build on it. For example, in a living room or den, light pictures on the wall creating the accent layer. Create general or ambient lighting with a chandelier, pendants or even recessed can lighting. Table and floor lamps are great layers of task lighting for enjoying a great book or crossword puzzle.

Whenever possible, I highly advise using lighting controls such as dimmers that will allow for fine tuning the layers of lighting in your home.

Thursday, August 2, 2007

A Few Pointers on Lighting Your Interior

Up lighting (light focused upward) can make low ceilings seem a bit taller.
Down lighting (light focused downward) can help keep attention away from unflattering ceilings.

You can make a small room seem larger by washing its walls with even lighting. An evenly lighted space will also eliminate the cave effect. In a large room, lighting up a few areas with pools of light can make the room feel smaller and cozier.

When buying a fixture, consider the beam pattern you're getting: focused, diffused or somewhere in between.

Fixtures may look smaller in a store than at home. Measure a fixture you're interested in. Find a box or other object of the same size and tack it to the wall or ceiling to see how it will fit the space before you buy.

It's wise to select furnishings and other décor materials in the same kind of light you live with. Borrow samples, if possible, to see how things look in your home lighting.

Reflectance has a lot to do with how we perceive light in a room. Matte finishes absorb light more than reflective surfaces. A room with wall-papered walls will need more light to look as bright as the same room with walls painted in a glossier finish. Glossy surfaces such as granite/marble countertops also affect reflectance levels.

Tuesday, July 31, 2007

Island Pendants

Hanging Island Pendants with Only One Junction Box?

Over the years I’ve often been asked what to do when considering replacing or adding lighting over a kitchen island or bar.

My answer: three to four individual mini-pendants. That’s great if you are willing to have an Electrician install the junction boxes or if you’re lucky you already have them in place.

But some applications with special ceilings have the home owners standing firm as cutting up their ceilings and installing more electrical boxes is not an option they are willing to explore.

My first question is: what is the kitchen island used for? I get a lot of different answers but most people are eating, reading or preparing food. Knowing this information helps with how many pendants and what type of light bulb, directional or non directional, is best suited for their use.

So getting back to the challenge of lighting a kitchen island with only one power source, here are my top 3 picks:

(A)Three low voltage pendants hung on a 12” decorative circular canopy.

(B) Three low voltage pendants hung on a 24” decorative rectangular bar canopy.

(C) A mono rail system with pendants and maybe a few directional heads for good measure. Low voltage systems offer more contemporary styles of glass pendants but 120 volt systems are the easiest and least expensive to install.

Monday, July 30, 2007

Venetian Glass Lighting Fixtures

The Veneto Luce is our newest collection incorporating handcrafted glass shades. Each glass shade is truly a work of art, created by artisans in the historic city of Venice, Italy, where glass making has been an art form for more than 700 years.

Using traditional forming methods, Venetian artisans form the glass shades into three distinctive shapes: Cylinder, Bowl, and Tulip. Each glass shade is available in three finishes: Whitewash, Amber, and Gold with Clear Rim.
The Hardware setting for these fine pieces is offered in Brushed Nickel, Dark Bronze and Matte Black.

The Veneto Luce Collection consists of Wall Sconces, Pendants, Pendant Clusters, Bathroom Vanity and Chandeliers of all sizes.

Tuesday, July 24, 2007

Connecting Your Track Lighting

Straight track joiners are offered in two ways: mini joiner and straight connectors.
Mini joiners are usually the correct choice for most applications as where the straight connectors not only connect tracks but also have a knockout that allows this component to double as a power feed. Mini joiners are the cleaner look and my recommendation for straight connecting of the track.

Flexible connectors add bulk to the system but allows for connection of tracks to any angle up to 90 degrees or wall to ceiling or pitched ceiling applications.

“L” connectors allow for a 90 degree angle in tracks. Most “L” connectors have a knockout that allows power access. Most “L” connectors are field adjustable for left and right hand applications.

“T” and “X” connectors also are quite popular in the commercial lighting world as well as the home. Again, these components have a central knockout making these connectors double as a power feed. “T” connectors are field adjustable for left or right hand applications.

Monday, July 23, 2007

Powering Track Lighting

You will need (1) power feed per track run no matter if the run is 4’ or 40’.

The first type of power feed is a live end power feed.
The live end feed snaps onto the end of your track and means that that end of the track must be placed directly over the junction box.
The live end feed has knock outs that allow wiring to feed through the back. If you are feeding power to your track with wire that has conduit casing be sure to use a live end feed that accepts 1/2 “ conduit.
The hard wired live end feed is my personal preference as it provides a clean hidden appearance.

Live end feeds can accommodate standard wiring, conduit wiring and can even be had with a cord and plug for the application that just can’t be hard wired.

The second type of power feed is the floating feed. The floating feed offers a bit more flexibility in that it allows for the feed connection to be made anywhere along the track. While more flexible I think the floating feed is a bit clunky looking.

Friday, July 20, 2007

The Versatile Track Light

Lighting fixtures are necessary for all households. They are necessary not only for illuminating an area but also to accentuate the look and feel of the rooms. Track lighting is one of the most widely used and highly versatile options as they are available in various shapes, sizes, designs, colors and power output options. Track lighting fixtures are used in homes, work places, art studios, theatres, cinemas, auditoriums and other public places.

Track lighting has the capability to provide directional and focal lighting. It provides ideal enhancement for areas with excellent general lighting but which need additional focus on accent features. It is commonly known that track lighting has always been most suited to contemporary styling. Designers are making innovative use of track lighting in homes, as accent or pendant lighting.

My preference is a sleek low voltage track head that powers a halogen MR16 lamp. These 2” high intensity light bulbs are the cleanest form of halogen I have seen and beam spreads range from very narrow spots to wide floods.


Monday, July 16, 2007

Outdoor Lighting Hillcrest Collection Review

One of our most popular families of outdoor lighting just added three new wall lanterns to the line up. The Hillcrest collection is a design made for classic Arts & Crafts style homes, but looks great on contemporary or modern homes as well. The opaque linen glass softens the light, reducing glare and hot spots.

Click on the Hillcrest Outdoor lighting collection links below then scroll down and view the entire Hillcrest collection:


Outdoor Wall Lantern Lighting
Outdoor Post Lantern Lighting
Outdoor Flush Mount Ceiling Lighting
Outdoor Hanging Pendant Lighting

Friday, June 29, 2007

Low Voltage Landscape Lighting Layouts

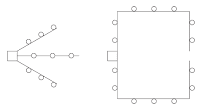
These diagrams show some of the most common low voltage cable/conductor layouts. Your choice of layout can help minimize voltage drop.

In the drawings the square represents the transformer and the circles represents the low voltage lights.

1. Straight run installation. Fixtures run in sequence directly from the transformer.


2. Split run installation Split the load using the recommended maximum cable/conductor length in two or more directions from the transformer. This method is also for use with multi-tap transformers.


3. "T" Installation This methods allows for the equal distribution of power to the center of a run, or to a run some distance away. The cable/conductor running from the transformer should be of a heavier gauge (10 gauge).


Other Thoughts to Minimize Voltage Drop:

The closer your lamps are placed to the transformer, the higher their voltage (and wattage) readings will be. Those farthest away will have lower voltages. If a cable/conductor run is too long, or if too many fixtures are being powered by a single transformer, noticeable voltage drop may occur. Voltage drop causes the lights farthest from the transformer to become dim. Voltage drop can be minimized in several different ways including those suggested in the illustrations above:
A) Use a multi-tap transformer (12-13-14-15)
B) Use multiple transformers
C) Shorten cable/conductor lengths (use multiple runs from the transformer)
D) Reduce individual fixture wattages
E) Reduce the total number of fixtures on a run

Thursday, June 28, 2007

A Quick Review of Accent Lighting Techniques

Path and Spread Lighting – provides safety, comfort and decorative accents to your landscape entrances and more.

Accent, Deck and Patio Lighting – provides the interest in your nightscape. Accent lights should be used sparingly to create visual focus.

Spotlighting – an effective technique for highlighting any statue, trees or entranceway.

Grazing – light placed to shine across a surface such as brick or stucco walls, or a natural surface like tree bark to bring out all the texture.

Silhouetting – the silhouette of an object can be created by reflecting light off a vertical surface behind it. The light source should be concealed, usually directly behind and below the object to be silhouetted.

Up Lighting – this technique provides dramatic effects. The light source is mounted or recessed in the ground and angled up to display a tree, artwork or structure.

Cross Lighting – uses two or more light source from below to illuminate an object from different directions.

Wednesday, June 27, 2007

Classic Elegance with Outdoor Lighting

Picture a rolling European country hill side bathed in afternoon sun. In the distance you’ll see a luxurious Grand Estate with a charming, yet elegant gatehouse. This beautiful setting is the inspiration for out Gatehouse Garden Lighting Collection featuring fine details of classic proportions.

Many of the products are made of durable brass, much like the sculptures found in museums and fountains in your favorite European cities. And like those sculptures, Gate House is beautiful to behold, yet functioning, adding a classic touch to any outdoor area.

The Gate House Collection:
A) Lighted Urn Planter
B) Path and Spread Light
C) Spitter Fish /Pond Light

Tuesday, June 26, 2007

Backyard Vacation

Enjoy the carefree sensation of a tropical island retreat with our St. Croix garden collection. A pineapple – the universal symbol of hospitality – is the design centerpiece and the elegant leaf and bamboo inspired details are reminiscent of southern plantations.

Made from heavy-duty solid die-cast aluminum, this collection is constructed to last. And with its sand colored beach finish and playful designs, St. Croix provides a backyard vacation every night of the year.

Collectables include:
Paint a tropical paradise with our landscape lighting expertise.

Friday, June 22, 2007

Lighting the Oak Trail

For the homeowner who wants to keep the outdoor spirit alive, we offer the Oak Trail Garden Collection. Inspired by the great outdoors, perhaps a cedar lodge nestled in the mountains, these outdoor lighting products blend with nature to create a warm and comfortable living space.

And because Oak Trail is made from durable materials, you can be sure its quality and finish will last for years. This collection of landscape lighting comes complete with a nice variety of
path lighting, post lighting and deck lighting.


Thursday, June 21, 2007

Recreate the Romance

English gardens were a source of refuge, providing the homeowners with a sense of serenity. Ainsley Square recreates the romance of an established, abundant English garden in springtime. Ainsley Square offers deck lighting, path lighting, as well as distinctive items such as an obelisk light and wall art.

Made from durable brass, the Ainsley Square Collection comes with a two-tone, aged look that will continue to patina over time. This helps retain its perfect color with nature while providing the homeowner a complete family of products that will create an inviting landscape and add years of enjoyment to outdoor living space.


Wednesday, June 20, 2007

Simple Tranquility with Landscape Lighting

Since its humble beginnings, Asian culture stressed a balance between one’s self and the environment to which they belong. Keeping this thought, our Zen Garden landscape lighting collection is minimal in its design yet bold in its presentation.
This family blends design influences from the Pacific Rim to create an updated Asian style with a natural earth tone finish perfect for any backyard sanctuary.

Zen Garden is versatile enough to provide simple tranquility of an Asian garden, yet exotic enough for the affluent homes of the western world. Made from durable materials, this family of path and deck lights, along with a lawn ornament in the shape of a whimsical gardener, ensures a quality appeal for many years. Brass will patina with age.


Wednesday, June 13, 2007

Modern Outdoor Lighting

One of our hottest new families of outdoor lighting is the Eternity Collection.

The modern design of the Eternity Collection offers a distinctive design that celebrates architectural lines and aesthetics that radiates style and light, creating enviable curb appeal.

The Eternity wall lanterns, finished with a popular brushed nickel, are available in small, medium and large. The medium wall lanterns are perfect for flanking your front door. The large lanterns are great around the perimeter of your home and look great flanking your garage door.

Last but not least, the Eternity outdoor pendant, post lantern and flush ceiling fixtures complete a look that belongs under your favorite porch or illuminating your patio lounge. A+

Thursday, June 7, 2007

FAQ: Posts and Post Lantern Lighting

One of the most frequently asked questions when it comes to putting together components for outdoor post lighting is:

Can I use a pedestal or pier mount along with a direct burial post for a more decorative finished look?

Generally speaking, this is not done. The universal 3” post will not feed though the pier mount nor will it sufficiently anchor a 72” standard post that is forced into the aluminum pier mount.

If you are using a direct burial post think gravel, grass, bark or another aesthetic ground cover for a nice looking transition.

If you are looking for a decorative post, Good News: Some manufactures are finally producing decorative surface mount posts that won’t break the bank.
The Covington surface mount outdoor post offers timeless style raising the reputation points in yourneighborhood.

Monday, June 4, 2007

Outdoor Lighting: Low or line voltage?

Both, here's a quick guide:

Use line voltage for: Up lighting large trees, statues, long driveways, or anywhere you need a lot of light installed with 3 or less fixtures. Post lanterns, wall lanterns, flood lights, pendant lighting and small runs of path lights are all outdoor lighting types that are good candidates for line voltage use.

Low-voltage is best when:You anticipate changing light locations. People, animals, children, etc. will be digging where there is water close by. When you want to do it yourself installation costs are important you want smaller fixtures the landscaping is already installed. Deck lighting, path and garden lighting, spot lighting, well lighting and brick lights are all very good candidates for low voltage lighting.

Adding landscape lighting improves curb appeal, expands living space and increases the safety and security of your home. The right lighting creates a warm and welcoming atmosphere for the exterior of your home and your yard.

Thursday, May 31, 2007

A Walk Through Vintage Park


The 19th century was a romantic time of horse-drawn carriages, high button shoes and gardens glimpsed beyond wrought iron gates. This era saw the birth of modern lighting – the gas light. With it’s globes of light, Vintage park focuses its attention on this era, but with decidedly modern materials.

The low voltage path, deck and garden lighting collection features extensive use of die cast aluminum in textured Tannery Bronze finish, which provides a striking contrast to the warm soft glow emitted from the gazing ball. Vintage Park includes a variety of coordinating products – from path and deck lighting to a variety of post lights. If you want to turn your outdoor area into a living space with a classic, romantic touch, plan a trip to Vintage Park.

Tuesday, May 29, 2007

Deck Lighting


Decks log more user-time at night than in the daytime. The lighting layout along the deck will complete the construction of the deck. The lightings give the deck a beautiful and appealing look after sunset. Deck lightings will make the deck beautiful and marvelous. Safety of the deck is enhanced with the charming use of deck lighting.

Low voltage lighting along the decks rails and posts will make the deck shine. Post-cap lightings come with a removable cover or lid enabling easier access to the bulbs. These lightings are very decorative too. There are numerous low voltage lightings available for lighting a deck. Low voltage lighting gives the deck a sparkling appearance.

Post lightings give the deck a great illuminating look. The tear drop look post lighting is an enchanting and a unique way of lighting. These lighting makes the deck a place to relax after the sunset. The post cap lightings are one type of stunning lighting which allows lights to spread in all the four directions.

Thursday, May 24, 2007

Set In Stone

The Tuscan Garden Outdoor Collection offers fixtures that are designed to enhance outdoor areas.

With an aged and weathered look, these wall sconces recall the rustic artistry of the stone mason’s hand.

Finished to look like works of art from the Tuscan countryside, these wall sconces are available in a select group of hand-painted faux finishes.
Available finishes: Bisque (unfinished), Greco Trevortine, Navarro Red, Spanish Tile, Real Rust, Granite, Mocha Trevortine and Navarro Sand.

All of the Tuscan Garden wall sconces come with a patented clear polycarbonate socket shelter. Wet location rated.